Bulletin boards have come a long way! No longer are they just a space to cover with paper and hang student work; bulletin boards are interactive, 3-dimensional, and fun to look at! My name is Shelly Rees, author of the
Appletastic: Blossoming in Fifth Grade blog, and having been a classroom teacher for over 20 years, I have a confession to make.
I'm kind of a bulletin board junkie. I love those rectangular spaces waiting to be turned into a work of art! I also have a problem: I'm not very artistic (trust me on this....my students find it hysterical when I try to illustrate something on the board). So through the years, I have learned some tips and tricks you can use to make your own bulletin boards POP, even if you don't feel like you are the most creative, artistic teacher in the world. Here they are; my
Top 10 Ways to Make Your Bulletin Boards POP!
1. Use Dimension in Your Title
Straight pins are perfect for helping you add dimension to your title. Print your title in whatever font you like, add a fun frame, and laminate. Instead of stapling the title to the board, push a straight pin through each corner of the title, and then pull the words away from the board a bit, leaving space between the words and the board. It creates an eye-catching effect and your board will get a lot of attention!
Like this bulletin board? Pop into
My TPT Store and find it there!
2. Use Your Favorite Fonts
It used to be that teachers had 2 choices for bulletin board lettering: die cut machines or pre-made letters that you punched out. The world of fonts opens brand new doors for teachers when creating titles on bulletin boards. Tami at O-H So Blessed! used her favorite KG Fonts for the title on her "If I Lived in a Snow Globe" board. She explains how in this
POST. I love both the before AND the after! Also, the extra embellishments of the coordinated snowflakes scattered along the edge are eye-catching. The background is wrapping paper, and the border is actually 2 borders layered. So clever....love those snow globes, too!
3. Banners are Beautiful!
I use a lot of banners in my classroom. I love the way they look and they add some much-needed color and decoration to an otherwise dull space.
Funky in Fourth uses banners to top off her bulletin boards. What a great idea!
4. Make it Interactive!
Bulletin boards can have a valuable place in your classroom for providing additional practice, reinforcement, and motivation. Add foldables, flaps, clips, activities and other interactive features to your boards. Your students really will love it!
Diary of a Not So Wimpy Teacher (love her name!) uses interactive bulletin boards throughout her classroom. Her "Tackling Tough Numbers" is an interactive arrangement of math vocabulary cards arranged on rings according to domain. Find out how she made this touchdown of a bulletin board
HERE.
5. Create a Faux Bulletin Board
Have very limited bulletin board space? Think outside the box and create your own faux bulletin board on the walls, old chalkboards, or doors. Simply adhere your background paper or fabric (I have one friend who dips fabric in liquid starch and smooths it onto the wall.) and then add a border.
Aris of
Sailing into Second created this absolutely beautiful "Tweet Heart" bulletin board on her door (left) and Meredith from
Creativity to the Core brightened up her blank walls with some faux boards (right).
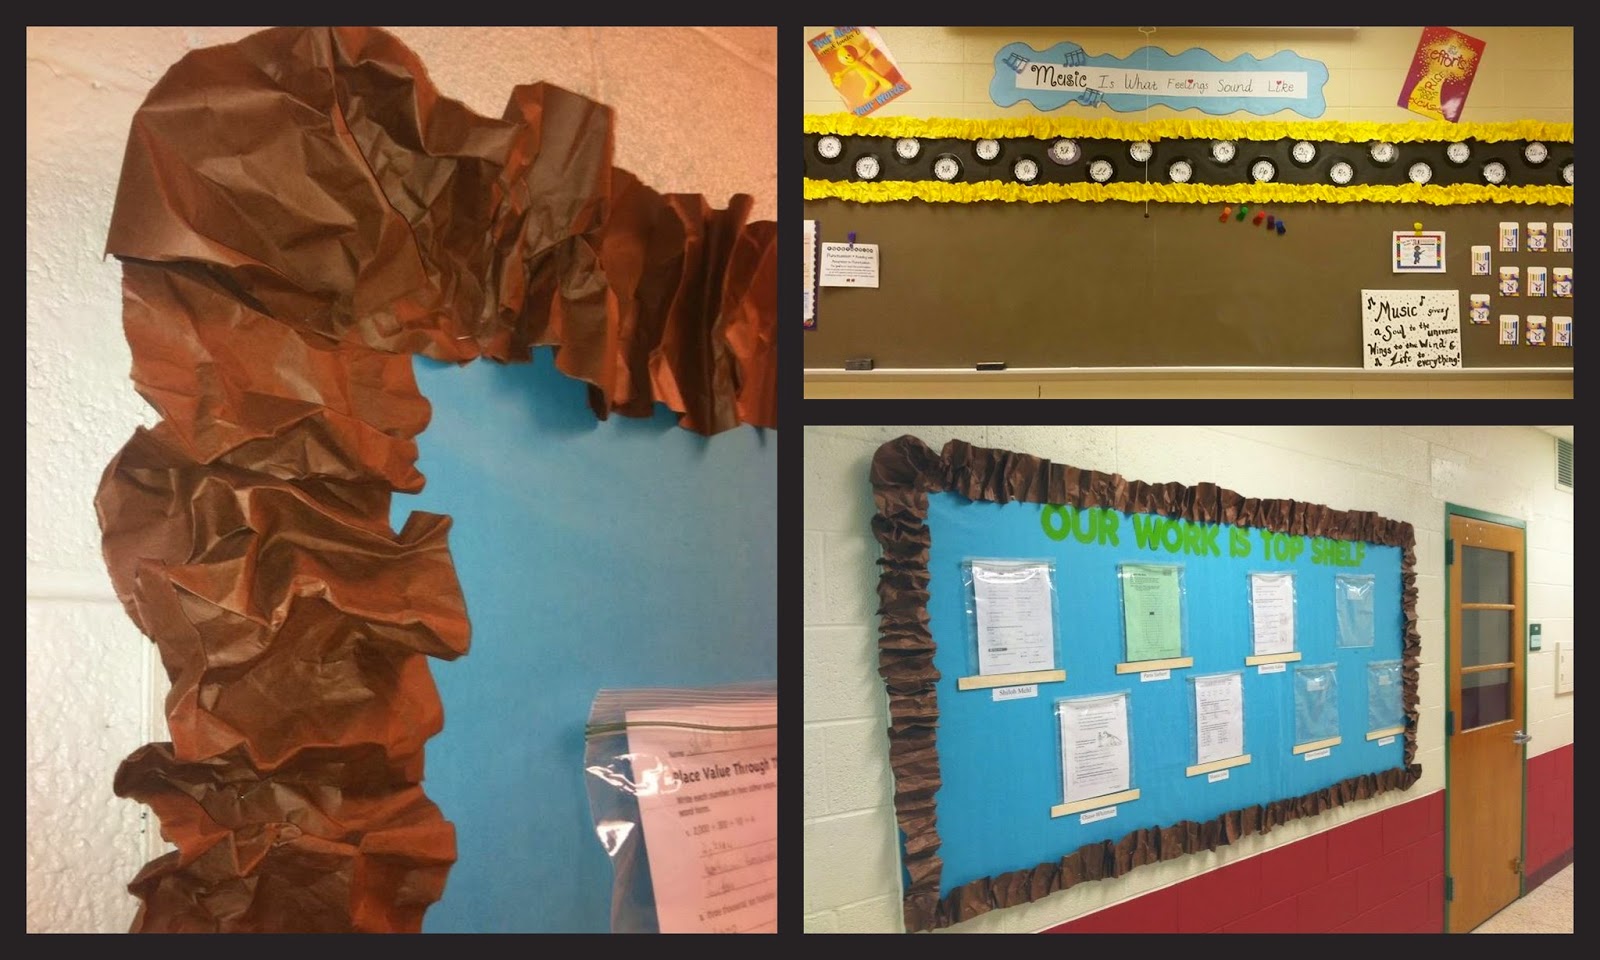
6. Crinkle Paper for a Fun Border
While store-bought borders have come a long way, and there is now a great variety available, sometimes it is fun to make your own. One way to achieve an unusual look is to create a crinkly border using long strips of bulletin board paper. Cut long strips of paper in whatever width you desire, crinkle a bit by hand, then staple to board in a crinkly (sorry for the over-use of the word "crinkly" here....I can't seem to think of a good synonym!) fashion. Voila! A creative look! Thank you to Julie J., who shared the photo of her musical bulletin board. :D
(The teacher who created the bottom board changes her student work samples often, so she staples clear protective sheets to the board and just drops in new work every week!)
7. Use Tissue Paper
Stephanie of
classroomdiy.com has a super tutorial for using tissue paper to add dimension and color to any bulletin board. Find her tutorial
HERE.
8. Tilt Title Letters at Different Angles
I have never been able to create a straight line with bulletin board titles. An easy solution for me was to purposely tilt the letters at various angles. I like the whimsical look this achieves!
You can buy this Boggle set
HERE.
9. Use Fabric for Your Background
When my sister first tried to get me to use fabric, I balked. I pictured a wrinkly background that would look too homemade and unpolished. I was wrong. She came to my school and helped me create a cohesiveness in my classroom by using the same fabric on all 3 bulletin boards in my room. The result was really nice and quite professional-looking. Want to learn how? Luckily for you,
Performing in Education has written an excellent tutorial for covering your bulletin boards with fabric! Check out her post
HERE.
10. Use a Variety of Materials
Add extra embellishments and materials to your bulletin boards to really make them stand out. Take a look at this sweet bulletin board created by Martha Hach of
Mrs. Hach's Owl Spot. The use of cotton for the smoke of the train really draws attention to the board! Love it!
There you have it - my Top 10 Ways to Make Your Bulletin Boards POP! I hope you're inspired to create something new...I'm already thinking about my next bulletin board adventure!