Saturday, January 17, 2015

Top 10 Web Tools to Use in the Classroom


Hi friends! Welcome to our "Top 10" series here at Upper Grade Memoirs! I'm Kim from For a Love of Teaching here to share with you my Top 10 Web Tools to Use in the Classroom. It was hard nearly impossible for me to come up with only ten web tools to share! I have so many! I actually had a hard time narrowing it down to just ten.

So, here goes.  I'll start with one of my favorites!

#1 Remind (formally Remind 101)
This is one of my favorite ways to connect instantly with students and parents.  Remind is a safe and FREE service that sends one-way messages via SMS, push notifications or email to anyone you invite with a special code for your class. Remind keeps phone numbers private while still staying in touch with students and parents. You can even set up numerous classes, or send a message to just one or a few students or parents on your list.
Simple step-by-step instructions are provided through a downloadable letter for parents. Try it today! You won't be disappointed!


#2 Symbaloo

Symbaloo is a FREE visual bookmarking tool that makes it simple and fun to organize the best of the web.  With an account you can access your bookmarks from any device and share your online resources with others. How can you use this in the classroom you might ask? Until recently I didn't really see a how this would be a "classroom tool", but you can create a webmix of links in an overview, share it at one time, and your students will get automatic updates when you make changes. Symbaloo will generate a link for you to share with others that will take them straight to your webmix.
Teachers are also using Symbaloo to create lesson plans by creating a webmix for each subject they teach. You can embed a webmix in your class website or blog. Check out their website for more ideas. The possibilities are endless! How do you Symbaloo?


#3 Story Jumper

I absolutely love this!  With this web tool students can create illustrated books with super easy tools and then publish their own hardback or paperback books. This website is very user friendly for students while bringing their imagination to life! The wide range of graphics are incredibly detailed and fun to explore. When turning the pages, it has a nice little papery "whoosh" sound just like turning the pages of a real book. Step-by-step instructions are available for teachers, and the Classroom Edition for teachers includes a separate dashboard with a lot of helpful resources.
Once published, parents have the option of purchasing their child's book, or it can be safely shared on Story Jumper, with friends and family through social media networks, or embed on a website. It's amazing what you can do with this site and the best part is that your students can become published authors!

#4 Kidblog

Kidblog is a safe and simple blog for your students. It provides teachers with tools to help students publish writing safely online. Teachers can effectively monitor all activity within a secure classroom blogging space. I love how Kidblog gives students' writing a meaningful purpose as they are motivated to write for their peers and engage with a global network.
This is a great way to engage students in the process of pre-writing, drafting, revising, editing, publishing, and (of course) commenting. Kidblog has a basic FREE edition, and a paid premium edition that comes with more features. I can't wait to try this with my class! I have a feeling they will love it!


#5 Timetoast

Timetoast is a FREE website where students and teachers can create engaging timelines complete with expanding windows, pictures, text, descriptions, and hyperlinks. It's so easy to create an account and use! It's a wonderful tool that allows students to create timelines of a story, research project, historical events, and much more. Students can add details, photos, and links to their timelines.
They can share their timeline on Timetoast and explore timelines made by others. Teachers can use Timetoast to create timelines for lesson plans and/or embed their timelines on their website. This is an amazing educational tool that can be used for any subject or topic related to time, history, or important events. Did I mention it's completely interactive?!?

#6 Google Drive (formally Google Docs)
This is a FREE web based service that allows students and teachers to create documents, presentations, spreadsheets, or upload previously created material. Students will need a gmail account which is easy to set up. What I love about Google Drive is that everything is stored electronically in
the Google cloud. Documents stored there can be accessed from almost any device with an internet connection. You can easily get sharable links and more than one person can be logged in and editing a document at any given time. As a teacher, you can have your students share their work or projects with you, and you can provide instant feedback usually from the comfort of your own home!  Now, how much better can it get? Right? Check out 12 Roles for Google Drive in the Classroom to get started!


#7 Class Dojo
This wonderful and FREE classroom management tool is quickly becoming one of the most popular web tools for teachers! I don't personally use it for myself, because I found it hard to manage in my classroom. However, there's so many teachers that use it and love it!  I definitely need to revisit this positive behavior management system. With Class Dojo each student has a profile that you set up - complete with their own avatar - to which teachers can assign positive and negative points (or dojo's) throughout the day.
There's an app that you can download to your phone which makes this tool manageable inside and outside of the classroom. All points and information is recorded on students' profiles that can be reviewed throughout the year. Parents even have their own login so they can view their child's performance and achievements from home. Class Dojo seems to have an astounding effect on students! Your class homescreen can be displayed on the board, and It serves as a constant visual reminder as you communicate with students without even having to say a word!  Students quickly begin to recognize the sounds that are played when dojos are rewarded, and it's encouraging to see an increase in effort as they try to earn points for themselves. There's so much hype about Class Dojo, and given the fact that over 35 million teachers use - it must be worth looking into!

#8 Graphite
Graphite is my new best friend!  Well...not really, but I do love it! Graphite makes it easy for teachers to find the best digital learning tools by giving them independent ratings and reviews based on a rigorous rubric. The site also gives teachers insights on how to best use these tools in their classroom. Who has time to waste on searching the web for a great app or website to introduce to your students or use in a lesson? Graphite takes all the leg work out of finding the best games, apps, and websites for your classroom. As a teacher, you can explore by topic or Common Core standard. Yes, Graphite is aligned with the Common Core Standards, and what's even better than that? It's FREE!


#9 Storybird
With more than 5 million stories in its database, Storybird is one of the world's largest storytelling communities! Students can make visual stories in seconds with  some of the best artwork from illustrators and animators from around the world! There are no ads on the site, and it has a user friendly format that makes it perfect for the classroom. Teachers are able to create student accounts, give students assignments, and easily view any stories their students have written. Students can collaborate with other students as they write stories together, and then share their stories with friends and family.
Once written, student's stories can be purchased for $1.99 (USD). This allows students to download a PDF file of their story which can easily be opened on the iBook app, on a Nook Color, or any Android device. Stories can also be embed into a blog or website which allows students to have an authentic audience to write for. I definitely want to try this out in my classroom this year!

#10 Go Noodle
Does your class need a few brain breaks throughout the day?  Of course they do! Maybe even more than one! If you haven't used Go Noodle yet, then you have to try it out.  I use Go Noodle almost every day in my classroom, and my students love it! So, what is Go Noodle? It's a FREE collection of interactive brain breaks that gets kids up and moving while channeling all of that classroom energy. Go Noodle uses research-based brain break activities that are healthy, engaging, and beneficial. You can literally complete a brain break in less than 5 minutes. Students can set goals as a class and be rewarded by their Champ, a virtual mascot, who grows as the class earned minutes needed to advance to the next level.
Teachers can set up multiple groups so that each class can view their own progress and rewards. All you need is a computer, internet access, and a screen (projector/interactive whiteboard). I use Go Noodle for rainy day recess, and it works great! It has a variety of exercise programs that I can choose from for my students. Our favorites are Zumba Kids and Koo-Koo Kangaroo. Now, they don't mind if it's raining outside, because they know they'll get to get their wiggles out using Go Noodle!

I hope you enjoyed my Top 10 Web Tools to Use in the Classroom! I could have added soooo many more! I'd love to know which web tools you use in your classroom. I'm sure you could add to my list. Leave me a comment and let me if there's some you think I should try!
       

Thursday, January 15, 2015

Top Ten Problem Solving Strategies


Problem solving can be so difficult for many students, and therefore, a headache for many teachers.  But, it doesn't have to be as scary as it sounds.  Here are some of my favorite strategies for helping calm the storm of anxiety word problems can cause!  


Top Ten Problem Solving Strategies


1.  If possible, use the same system school wide


  • I realize that this is not necessarily up to you, but when possible, it helps students to use similar vocabulary, strategies, and visuals throughout their educational career.  If you can't convince your WHOLE school to use the same strategies, maybe you can at least talk to the grade level above and/or below yours to help make the process a little easier on everyone.  


2.  Visualize!  Act it out, draw pictures, etc.


  • Acting it out isn't just for reading a book!  Take STORY problems to a different level by acting out what it is saying.  I have found that many kids are just going through the motions without really thinking about what the problem is asking.  By acting out the problem, they can then determine if their answer makes sense or not.
  • Draw pictures to show how to solve the problem OR what it is showing.  Using visuals like whole, part, part boxes can also help students "see" the problem clearly.  


3.  Cooperative learning groups


  • Working in groups (or just partners) can help in many different ways.  Not only do kids get the chance to talk out their ideas, they can strategize together and see that there isn't only one way to get the answer.  Just be careful--too many times, one or two kids are "leading" the whole group while others are not participating.  Be sure to take the time to teach cooperative learning rules and roles ahead of time.

4.  Deconstruct the problem


  • Tear apart the question and put it back together as a class.  Just as we break apart sentences and parts of stories, we can do the same for story problems.  Let the kids see what the parts make up a good question and what test writers are doing when writing problems in certain ways.  


5.  Build on what they know (interests, school info, class names, etc.)


  • By starting with what they know and are familiar with, students can grasp the tough concepts a little easier.  Make your own problems using student names, local locations, and events in which your kids are interested.  They will be more likely to read the problem carefully as well.  Of course, you can slowly add less and less "familiar" concepts as the year progresses when th students are stronger with their skills.

6.  Differentiate


  • We do this with EVERYTHING, right!?  Word problems are no different.  You can use the exact same question with different numbers to make the math easier while still practicing the same type of questions.  For example, for your low kids, you might simply use 1 or 2 digit addends; for your middle group, you might use 3 digit addends; and for your advanced learners, you might add an extra number to add OR you might add unnecessary information for the students to sort through.  


7.  Let the student become the teacher


  • Have the kids practice becoming the Problem Solving Authors themselves!  By writing the problems, students will think about the problems in a different way than they do while trying to solve the problems.  By having them include answer sheets, you can also assess their actual math skills too.  BONUS:  you will have an entire set of word problems for your next test, center, or task cards!

8.  Explain your thinking


  • Not only does this mean to explain your thinking as you teach the lesson, but also have the kids explain THEIR thinking as they go through the process.  Rather than having them just give you the answer, ask them to explain step-by-step what they thought and did.  This will be GREAT practice for those dreaded state tests that ask for written work in order for the child to receive full credit!

9.  Estimate or think through to check work


  • Teach the kids the valuable process of checking to see if an answer makes sense.  For example, if the question says, "Dog 1 weighs 81 pounds and dog 2 weighs 59 pounds.  How much more does dog 1 weigh than dog 2?" you can teach the kids to think first that 80 is 20 more than 60, so the answer should be close to the number 60.  That way, if they subtract incorrectly, forget to borrow, and get the answer of 32, they will know they need to go back and check again.   


10.  Confidence!


  • I left this for last to leave you with an important idea.  If a student THINKS he/she isn't good at problem solving, he/she WON'T be good at it!  This can be said about anything, but I see it happen way too often with math, specifically word problems.  Remember to compliment ANY accomplishments your kids make while practicing their problem solving skills.  Maybe that means starting with the basics (yes, I mean adding 3 + 5 and the same).  That is okay for a start!  The important thing is that they UNDERSTAND the question and what it is asking.  You can build on the math skills throughout the year.  

There are many other ways to teach problem solving.  I would love to hear what YOU do in your class to make word problems a little easier on your kids.  


Tuesday, January 13, 2015

Top 10 Ways to Make Your Bulletin Boards POP!

Bulletin boards have come a long way!  No longer are they just a space to cover with paper and hang student work; bulletin boards are interactive, 3-dimensional, and fun to look at! My name is Shelly Rees, author of the Appletastic: Blossoming in Fifth Grade blog, and having been a classroom teacher for over 20 years, I have a confession to make. I'm kind of a bulletin board junkie.  I love those rectangular spaces waiting to be turned into a work of art!  I also have a problem: I'm not very artistic (trust me on this....my students find it hysterical when I try to illustrate something on the board). So through the years, I have learned some tips and tricks you can use to make your own bulletin boards POP, even if you don't feel like you are the most creative, artistic teacher in the world. Here they are; my Top 10 Ways to Make Your Bulletin Boards POP!

1.  Use Dimension in Your Title
Straight pins are perfect for helping you add dimension to your title. Print your title in whatever font you like, add a fun frame, and laminate. Instead of stapling the title to the board, push a straight pin through each corner of the title, and then pull the words away from the board a bit, leaving space between the words and the board. It creates an eye-catching effect and your board will get a lot of attention!
Like this bulletin board?  Pop into My TPT Store and find it there!

2.  Use Your Favorite Fonts
It used to be that teachers had 2 choices for bulletin board lettering: die cut machines or pre-made letters that you punched out. The world of fonts opens brand new doors for teachers when creating titles on bulletin boards. Tami at O-H So Blessed! used her favorite KG Fonts for the title on her "If I Lived in a Snow Globe" board. She explains how in this POST.  I love both the before AND the after!  Also, the extra embellishments of the coordinated snowflakes scattered along the edge are eye-catching. The background is wrapping paper, and the border is actually 2 borders layered. So clever....love those snow globes, too!


3.  Banners are Beautiful!
I use a lot of banners in my classroom. I love the way they look and they add some much-needed color and decoration to an otherwise dull space. Funky in Fourth uses banners to top off her bulletin boards. What a great idea!


4.  Make it Interactive!
Bulletin boards can have a valuable place in your classroom for providing additional practice, reinforcement, and motivation. Add foldables, flaps, clips, activities and other interactive features to your boards. Your students really will love it! Diary of a Not So Wimpy Teacher (love her name!) uses interactive bulletin boards throughout her classroom. Her "Tackling Tough Numbers" is an interactive arrangement of math vocabulary cards arranged on rings according to domain. Find out how she made this touchdown of a bulletin board HERE.


5.  Create a Faux Bulletin Board
Have very limited bulletin board space? Think outside the box and create your own faux bulletin board on the walls, old chalkboards, or doors. Simply adhere your background paper or fabric (I have one friend who dips fabric in liquid starch and smooths it onto the wall.) and then add a border. 
Aris of Sailing into Second created this absolutely beautiful "Tweet Heart" bulletin board on her door (left) and Meredith from Creativity to the Core brightened up her blank walls with some faux boards (right).


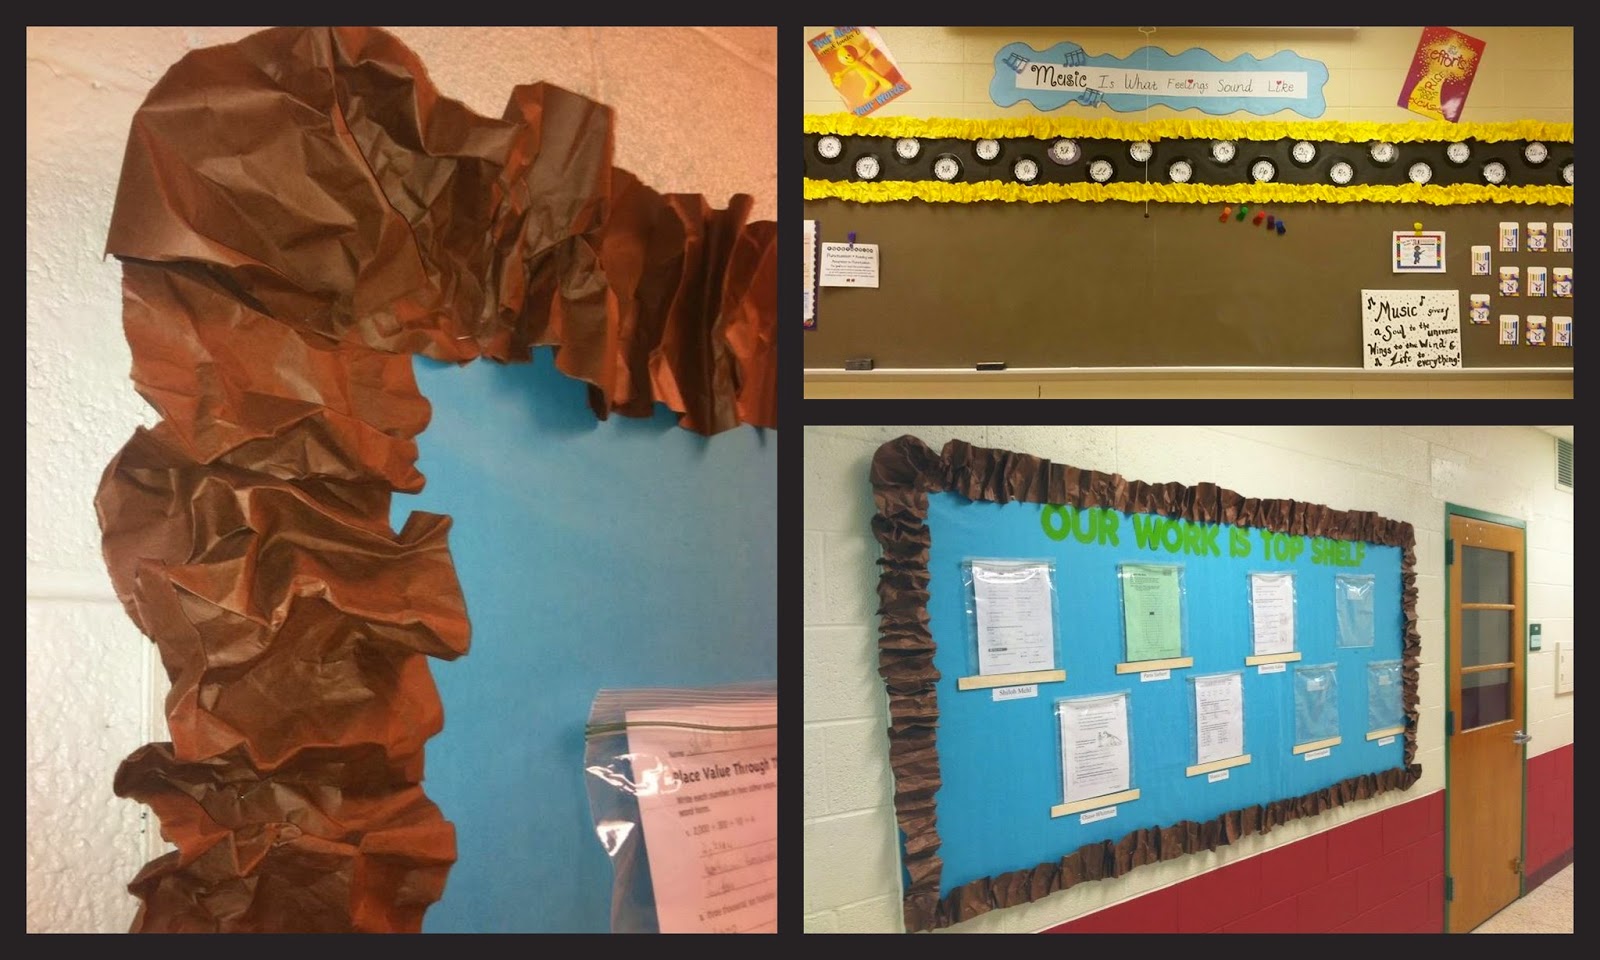
6.  Crinkle Paper for a Fun Border
While store-bought borders have come a long way, and there is now a great variety available, sometimes it is fun to make your own. One way to achieve an unusual look is to create a crinkly border using long strips of bulletin board paper. Cut long strips of paper in whatever width you desire, crinkle a bit by hand, then staple to board in a crinkly (sorry for the over-use of the word "crinkly" here....I can't seem to think of a good synonym!) fashion. Voila! A creative look! Thank you to Julie J., who shared the photo of her musical bulletin board. :D 

(The teacher who created the bottom board changes her student work samples often, so she staples clear protective sheets to the board and just drops in new work every week!)

7.  Use Tissue Paper
Stephanie of classroomdiy.com has a super tutorial for using tissue paper to add dimension and color to any bulletin board. Find her tutorial HERE.


8.  Tilt Title Letters at Different Angles
I have never been able to create a straight line with bulletin board titles. An easy solution for me was to purposely tilt the letters at various angles. I like the whimsical look this achieves!

You can buy this Boggle set HERE.
9.  Use Fabric for Your Background
When my sister first tried to get me to use fabric, I balked. I pictured a wrinkly background that would look too homemade and unpolished. I was wrong. She came to my school and helped me create a cohesiveness in my classroom by using the same fabric on all 3 bulletin boards in my room. The result was really nice and quite professional-looking. Want to learn how?  Luckily for you, Performing in Education has written an excellent tutorial for covering your bulletin boards with fabric! Check out her post HERE.


10.  Use a Variety of Materials
Add extra embellishments and materials to your bulletin boards to really make them stand out. Take a look at this sweet bulletin board created by Martha Hach of Mrs. Hach's Owl Spot.  The use of cotton for the smoke of the train really draws attention to the board!  Love it!


There you have it - my Top 10 Ways to Make Your Bulletin Boards POP!  I hope you're inspired to create something new...I'm already thinking about my next bulletin board adventure!


Sunday, January 11, 2015

Top 10 Mentor Texts for Writing

Is your class library stocked or are you in the process of building a meaningful library?  There are so many fabulous books to go along with your lessons.  Mentor texts provide your students with an authentic example of the lesson regardless of the subject.  In writing, it can show a type of writing, a specific skill, or how to improve writing.  I am Pam Olivieri with Rockin Resources.  I have a passion for writing and look forward to writing each day with my fourth graders.  I hope they see my excitement!  For each mini lesson, I like to have a mentor text when introducing the lesson.  It is important to show students a quality example of the lessons throughout the writing process- before writing, while writing, as well as revising and editing.

To start off, share an example of the type of writing you expect your students to write.  See two of my favorites:

1.  Narrative Writing-  Uncle Jed's Barbershop by Margaree King Mitchell


2.  Opinion Writing-  I Want an Iguana by Karen Kaufman


3.  Suspense/Climax- Cinderella

One of my favorite mentor texts for narrative writing is Cinderella regardless of the author.  Why?  It has so many narrative writing elements!  See below how I use it to teach Suspense and Climax!  I usually pretend I am on a roller coaster and stop at each action as I retell the story.  The kids love it and ask me to do it again!  The sample slides/posters are taken from Interactive Writing Notebooks.


4.  Setting-  Working Cotton by Sherley Anne Williams.  Awesome example!


5.  Developing Character - Rotten Ritchie and the Ultimate Dare by Patricia Polacco.  How does this book show a character developing?  Ritchie teases his sister Trisha about taking ballet. Trisha knows how much work it takes so she challenges Richie to perform in her ballet recital.  Richie agrees, under one condition: Trisha has to join his hockey team for the big game!  Ritchie’s character changes throughout the story as he realizes how difficult it is to perform ballet.  He changes from teasing, belittling and disgusting to being respectful towards his sister's hard work.


6.  Dialogue-  How I Became a Pirate by Melinda Long.  You will find many examples to share with your students!


7.  Transition Words-  Through Grandpa's Eyes by Patricia Maclatian.


8.  Rockin Beginnings- Love, Ruby Lavender by Deborah Wiles.  The beginning of this story certainly rocks!  It grabs my student's attention right away.  It begins like this:
“Murderers! You can’t have them all!”
Ruby Lavender leaned out the car window 
and shook her fist. The car lurched to a 
halt in the dirt yard of Peterson’s Egg 
Ranch, and Ruby scrambled out the door. 
She ran in bare feet as fast as she could 
into a dusty sea of chickens—a sea of 
chickens being herded toward their 
death at the chopping block.

Don't you love it?


9.  Word Choice (I call Million Dollar Words)-  I Love You the Purplest by Barbara M. Joossee


I love this part of the story:  The lake slowed its thrashing to a soft, even beat. The mosquitoes dipped low to the water and the water bugs skittered on top. The moon glowed on one side of the lake while the sun shimmered on the other.  WOW!  You can certainly see a picture in your mind!


10. Jammin Conclusions-  Owl Moon by Yolen


You won't be disappointed with this one either!  I hope this helps you in your planning for writing!  Come back and visit for more Top Tens this month!!!!

As always, 
ROCK 'N' WRITE!!!
  
#topten  Written by Pam from Rockin Resources


Related Posts Plugin for WordPress, Blogger...